Tuesday, December 20, 2011

Peppermint Bark

Photobucket
My little sister likes peppermint bark. I found this "recipe" several places, including the food network website. It really only has 3 ingredients. It's very easy and you don't need any special stuff. I recommend using a food processor for the candy canes but you can just crush them with a rolling pin or hammer. I like the uniformity you get with the food processor.

Photobucket
I got a box of 12, what I would call "regular-sized," candy canes. I crushed 10 of them to get a cup of pieces to mix in with the chocolate. I crushed the remaining 2 to sprinkle on top. As a misguided, last minute tweak, I added some chocolate chips to try to make some white chocolate swirled with dark chocolate. So half of it came out a sort of muddy brown. In retrospect, the best way to get the marbled effect would probably be with two double-boilers, mixing the chocolates together on the baking sheet.

Ingredients:
Crushed candy canes, to yield 1 cup
2 pounds white chocolate
Peppermint flavorings, optional (I used 4 tsp.s but I like it minty)

Directions:
Place candy canes in a plastic bag and hammer into 1/4-inch chunks or smaller.
Photobucket

Melt the chocolate in a double boiler. (I used a stainless steel mixing bowl on top of a saucepan full of water to make a double-boiler to melt the chocolate).
Photobucket

Combine candy cane chunks with chocolate (add peppermint flavoring at this point if desired).
Photobucket

Photobucket

Pour mixture onto a cookie sheet layered with parchment or waxed paper (sprinkle remaining candy pieces on top at this point) and place in the refrigerator for 45 minutes or until firm.
Photobucket

Here are the muddy ones. They don't taste terrible but I'll have to melt the two separately and mix them on the sheet together next time.
Photobucket

Friday, December 16, 2011

Guilty Carnitas

Photobucket
I haven't made a big meaty meat dish in a long while. Even though I am ambivalent about eating meat, to say the least, I have mostly given up on my youthful ideals in order to eat choice mouthfuls of my favorite meat, pork, every now and then. I keep waiting for the day to come when I will say "No more!" and stick to tofu and broccoli like I used to, out of guilt and shame and love of animals, but when you really get interested in cooking it's very hard to eliminate animal proteins entirely.

With that, I excitedly yet guiltily bring you another recipe that I stole from smittenkitchen.com. A dish that seems remarkably easy to do well.

Homesick Texan Carnitas
Stolen from smittenkitchen and
Adapted, just barely, from The Homesick Texan Cookbook

3 pounds boneless pork shoulder or pork butt, cut into 2-inch cubes
1/2 cup orange juice
1/4 cup lime juice (from about 2 to 3 limes)
4 cloves garlic, peeled and crushed
1 teaspoon ground cumin
1 teaspoon Kosher salt, plus more to taste

Corn tortillas, for serving plus
Avocado slices, chopped cilantro and fixings of your choice (we love pickled jalapenos or onions, lime wedges and a bit of slaw)

Photobucket

Photobucket

Place the pork in a large Dutch oven or heavy pot. Add the orange juice, lime juice, garlic, cumin, salt and enough water to just barely cover the meat. Bring the pot to a boil and then reduce the heat to a simmer. Simmer uncovered for two hours. Don’t touch the meat.

Photobucket

After two hours, increase the heat to medium-high and while occasionally stirring and turning the pieces, continue to cook for about 45 minutes, or until all of the liquid has evaporated, leaving only the rendered pork fat. Let it sizzle in this fat long enough to brown at the edges, turning pieces gently (they’ll be eager to fall apart), only as needed.

Photobucket

Photobucket

When pork has browned on both sides, it’s ready. Adjust seasonings to taste and serve on warmed tortillas with fixings.

Photobucket

*After browning all of the meat the bottom of my dutch oven looked like a bleak map of the world after the ravages of global warming:
Photobucket

It came out perfect aside from sticking a little bit too much to the bottom. We used flour tortillas and habanero hot sauce and a little sour cream.

Sunday, December 11, 2011

You Always Keep Me Waiting, Madeleines

Photobucket
I am getting in the mood for baking Xmas cookies. I love Madeleines because they are simple to make and so bright and fresh with the lemon zest. Maybe not the most Xmas-y cookie, but something magical happens when you mix lemon zest with sugar and butter and apply heat, although even without the heat the batter is impossible to resist. I put away spoon fulls of it and wonder why my yield is so low...I made this particular batch to give to my brow-waxer. Anyone who can be bothered to look at this mug on a monthly basis for two years in a row deserves some special recognition.

You definitely need the special pan with the shell indentations if you want anyone to have even the slightest clue as to what you just made. I have had prior success making these in a mini cupcake pan though the effect isn't quite as elegant.

*I can't stress this enough, butter and flour the heck out of your pan. There is nothing more frustrating than a perfectly adorable, golden Madeleine that has been entombed in a pan and the only way you can dislodge it is by ruining it entirely.

When they are done you can do several treatments depending on your mood. There is the classic sprinkling of powdered sugar. I prefer to either leave them as is or dip them into chocolate so dark that light cannot escape its surface. This is an especially good way to preserve their moisture if you plan on keeping them around for more than a day or giving them as a gift. You can then roll the still-warm chocolate dipped Madeleines in chopped roasted pecans or almonds or even tiny chocolate chips if you are feeling a little insane. Defy logic!

Photobucket
Ingredients:
1 tsp baking powder
2/3 c. sugar
1 c. flour
2 large eggs
10 tbsp unsalted butter (melted then cooled slightly)
1 tsp grated lemon peel
1 tsp vanilla extract
pinch of salt

Yield: about 2 dozen cookies. I got about 20 but then I ate a lot of batter and overfilled some of the shells because I'm out of practice.

1. Preheat oven to 375. Butter and flour pan.

2. Beat eggs and sugar just to blend. Beat in vanilla, lemon peel, salt.
Photobucket

Photobucket

3. Add flour and baking powder, beat until just blended. Gradually add melted butter in a steady stream, beating until just blended (This step is impossible to photograph yourself doing, btw).
Photobucket

4. Spoon one tbsp into each indentation. Bake until puffed and brown, about 13-16 mins. Cool for 5.
Photobucket

Photobucket

Photobucket

Photobucket

Thursday, November 17, 2011

Getting It Right: Brussels Sprouts

I finally perfected my recipe for Brussels Sprouts. The previous recipe with the scallions was good but I think using a strip of bacon is the way to go. Parmesan cheese and lemon juice/zest are also acceptable alternatives. I think the amount of flavor you get from one strip of bacon is just right.

Ingredients:
3 cups of Brussels Sprouts (cut in half, yellow leaves removed)
2 tablespoons of olive oil
salt
black pepper
1 or 2 strips of bacon

Directions:
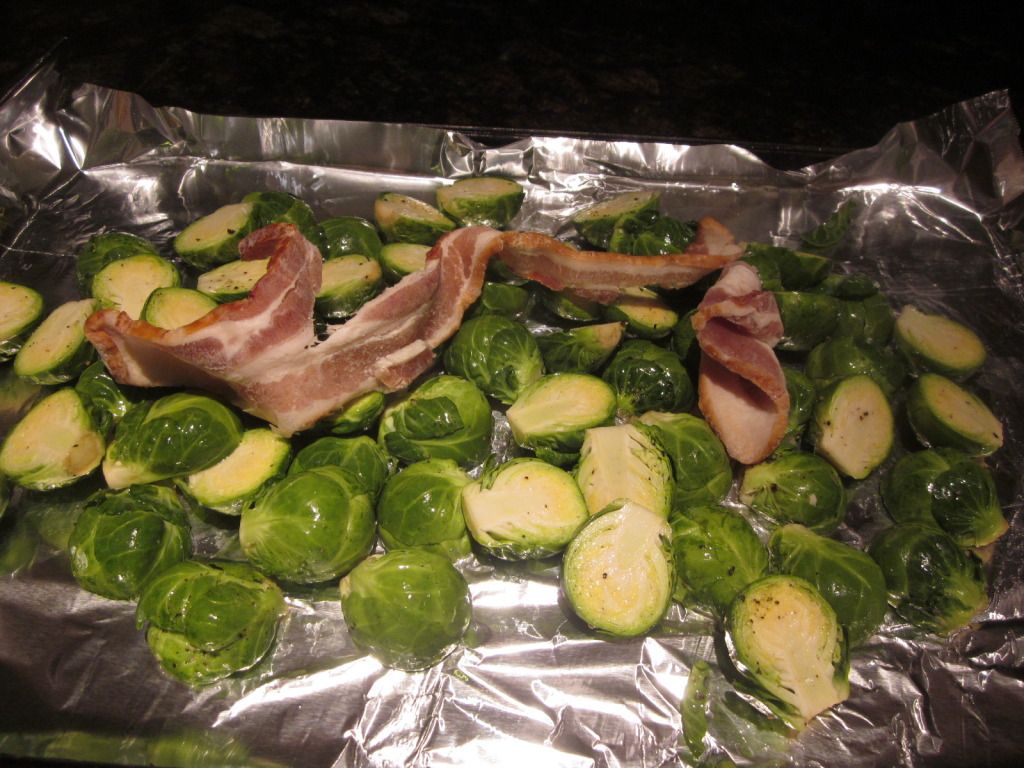
1. Preheat oven to 400 degrees. Trim the bottom of the sprouts, leaving the core in tact. Cut the sprouts in half.
Photobucket

Photobucket

2. Place sprouts in a bowl and drizzle with olive oil and sprinkle with salt and olive oil.

3. Spread sprouts evenly and place bacon strip(s) across the top.
Photobucket

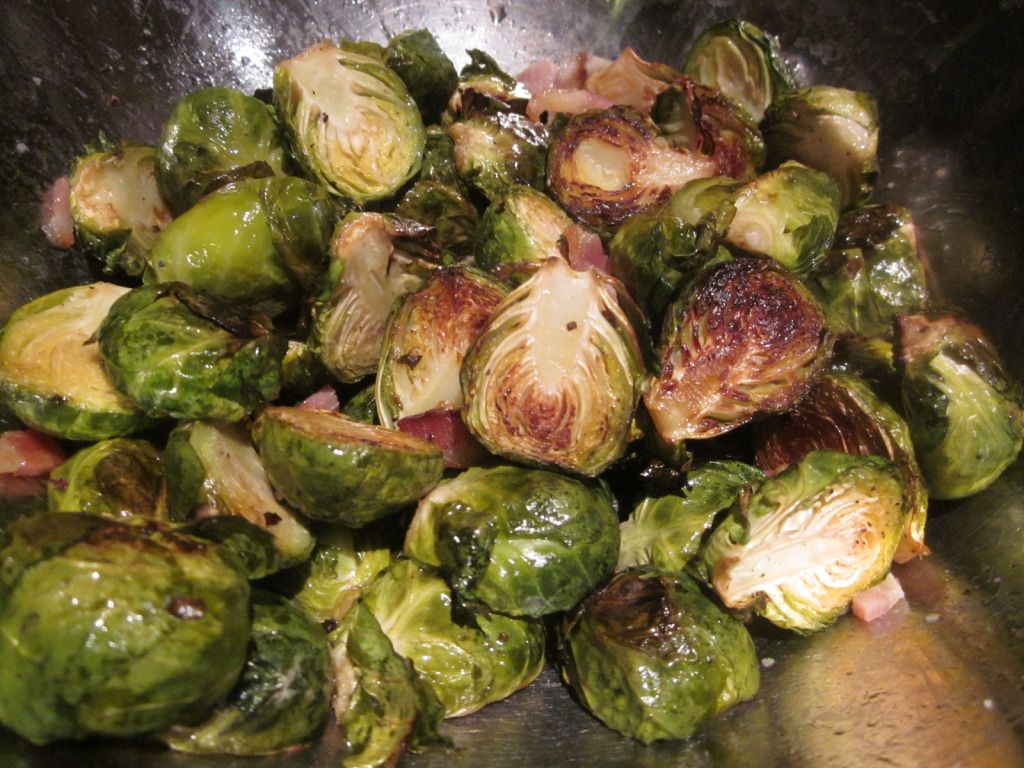
4. Bake for 40 minutes, stirring the sprouts about 3 times to ensure even cooking.

5. Remove and chop the bacon into small strips and toss with sprouts in a bowl.
Photobucket

Sunday, November 13, 2011

Black Velvet Cupcakes with Dark Chocolate Ganache Frosting

Photobucket

I have been meaning to make chocolate ganache for a long time. I love the way it looks when it's piped on top of a cake--all tidy and glossy. It was remarkably easy to make. There are really only two ingredients: cream and chocolate. I didn't have enough chips so I added a few little bars of chocolate that I had sitting around. I pulsed them in the food processor to ensure that everything would melt evenly when I poured the cream in.

*I made the ganache first so that it could set up to a texture where I could pipe it out by the time the cupcakes were cool.


I took this recipe from sweetsavorylife.com:


Chocolate Ganache

Ingredients:
12 ounces chocolate, chopped into small pieces
1 cup heavy cream
optional 3 tablespoons flavored (I used 3 tablespoons of espresso)

Instructions

1. Place chocolate pieces in a large bowl.
Photobucket

Photobucket

2. Heat heavy cream on medium high until it comes to a boil.
Photobucket

Photobucket


3. Remove from heat and immediately pour cream over chocolate and stir until completely mixed and glossy.
Photobucket

4. Allow ganache to cool before pouring over cakes as a glaze. The longer you allow the ganache to cool, the thicker it will set. Typically I stick mine in the refrigerator so it is slightly cold before whipping. For piping or frosting, allow the ganache to completely cool and set up. When you are able to spoon the ganache and it can hold its texture, it is ready for piping.
Photobucket


I used that old Hershey's Midnight Cake recipe, although no actual Hershey's chocolate was used in these particular cupcakes.

Photobucket

update*

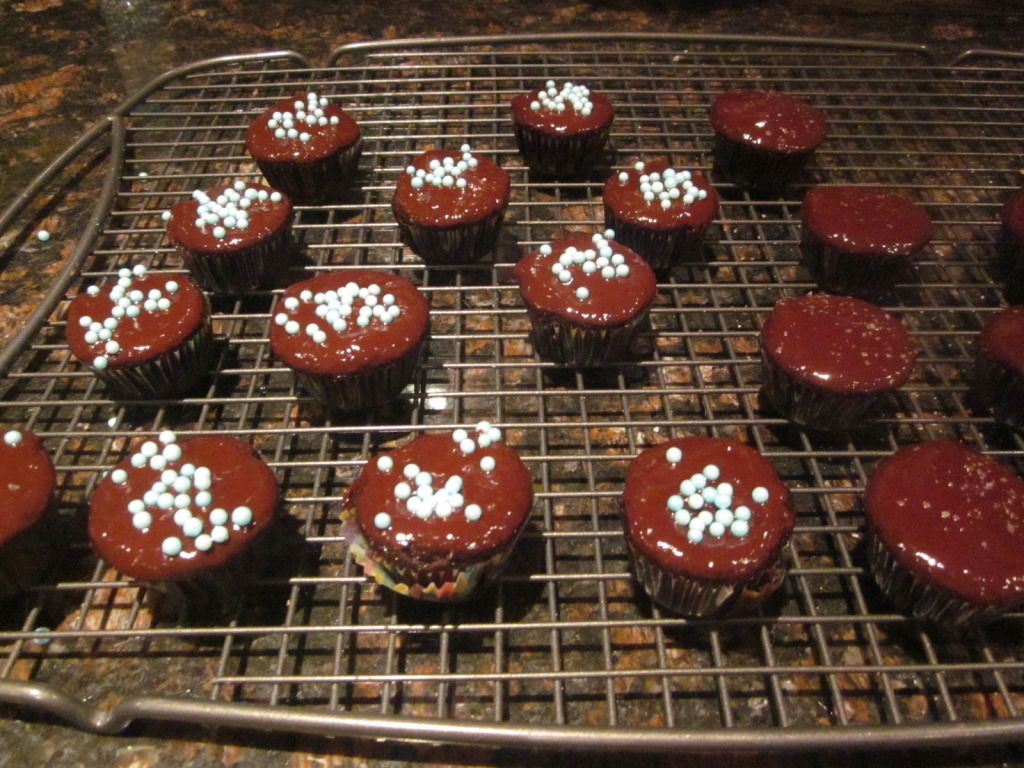
I had a hard time piping the ganache so I ended up just heating it and applying it as a glaze. It was still delicious but I need to work on my tempering.
Photobucket

Tuesday, August 9, 2011

Strawberry Birthday Cakes!

I am feeling very girly for this birthday. I wanted to make a strawberry cake/cupcake. We found this recipe for Sprinkles cupcakes and frosting. They are pretty good. It's a little on the sweet side for me. I would reduce the amount of sugar in the cake and frosting both next time.

They did come out this beautiful pink color and were full of fresh strawberry flavor.
Photobucket

Ingredients

* 2/3 cup whole fresh or frozen strawberries, thawed
* 1 1/2 cups all-purpose flour, sifted
* 1 teaspoon baking powder
* 1/4 teaspoon coarse salt
* 1/4 cup whole milk, room temperature
* 1 teaspoon pure vanilla extract
* 1/2 cup (1 stick) unsalted butter, room temperature
* 1 cup sugar
* 1 large egg, room temperature
* 2 large egg whites, room temperature
* Sprinkles' Strawberry Frosting

Directions:
1.Preheat oven to 350 degrees. Line a 12-cup muffin tin with cupcake liners; set aside.

2. Place strawberries in a small food processor; process until pureed. You should have about 1/3 cup of puree, add a few more strawberries if necessary or save any extra puree for frosting; set aside.

3. In a medium bowl, whisk together flour, baking powder, and salt; set aside. In a small bowl, mix together milk, vanilla, and strawberry puree; set aside.
Photobucket

4. In the bowl of an electric mixer fitted with the paddle attachment, cream butter on medium-high speed, until light and fluffy. Gradually add sugar and continue to beat until well combined and fluffy. Reduce the mixer speed to medium and slowly add egg and egg whites until just blended.
Photobucket

Photobucket

5. With the mixer on low, slowly add half the flour mixture; mix until just blended. Add the milk mixture; mix until just blended. Slowly add remaining flour mixture, scraping down sides of the bowl with a spatula, as necessary, until just blended.

6. Divide batter evenly among prepared muffin cups. Transfer muffin tin to oven and bake until tops are just dry to the touch, 22 to 25 minutes. Transfer muffin tin to a wire rack and let cupcakes cool completely in tin before icing.

Photobucket

Photobucket

Photobucket

Frosting

Ingredients

* 1/2 cup whole frozen strawberries, thawed
* 1 cup (2 sticks) unsalted butter, firm and slightly cold
* Pinch of coarse salt
* 3 1/2 cups confectioners' sugar, sifted
* 1/2 teaspoon pure vanilla extract

Directions

1. Place strawberries in the bowl of a small food processor; process until pureed. In the bowl of an electric mixer fitted with the paddle attachment, beat together butter and salt on medium speed until light and fluffy. Reduce mixer speed and slowly add confectioners' sugar; beat until well combined. Add vanilla and 3 tablespoons strawberry puree (save any remaining strawberry puree for another use); mix until just blended. Do not overmix or frosting will incorporate too much air. Frosting consistency should be dense and creamy, like ice cream.

Photobucket

Photobucket

Photobucket

Photobucket

Monday, August 8, 2011

Zucchini and Pattypan Squash Lasagna

My sister is in town and we were wanting something to do with all of the adorable pattypan squash that was dirt-cheap at the market. We wanted to make a vegetable lasagna but we wanted to roast the vegetables first to get some of the water out. If you are a vegetarian, I'm sure you've had your share of watery vegetarian lasagna. This method worked well.

Photobucket

1 large or 2 small eggplant(s)
2 zucchini
5 pattypan squash
2 portobello mushroom
1 yellow onion
1 package of cherry tomatoes
5 sheets of fresh pasta (can use box sheets but I would boil them first)
48 ounces of tomato sauce (fresh or jar works fine)
16 ounce package of fresh mozzarella (can use shredded dry kind too)
10 leaves of fresh sweet basil
2 tablespoons of dried oregano
crushed red pepper to taste


1. Preheat oven to 400 degrees. Use a mandoline to slice squash, zucchini, and eggplant very thin. Toss with salt, pepper, and olive oil and roast in oven for about 20 mins, until a lot of the water evaporates.

2. Chop onion and mushroom--we also threw some cherry tomatoes in here because we had leftover but you don't need to use them. Saute with olive oil and set aside.
Photobucket

3. After the squashes are roasted take them out and start to layer the lasagna pan. I turned the oven down to 350 degrees here. Since the ingredients are essentially cooked at this point I only had this in the oven for about 45 mins. Layer it like this:
a. Sauce
b. Pasta Sheet
c. Squashes
d. Mushrooms and Onions
e. Cheese --try to end up with sauce on the last layer or just cover it with a layer of sauce no matter which you are on.
Photobucket

4. I like to put more cheese on top after it finishes baking. We didn't even take a picture of it because we got really occupied with frying the extra eggplant! I also did a chicken breast for my dear husband. I feel bad when I impose too many vegetarian meals on him.
Photobucket