Thursday, March 24, 2011

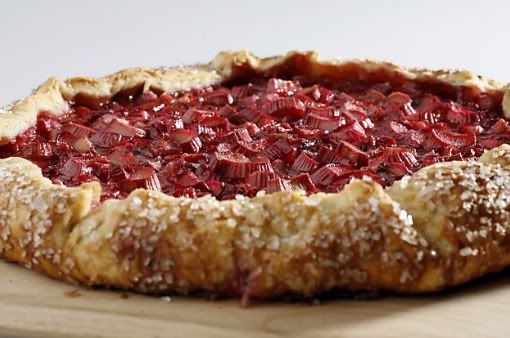
Rhubarb and Strawberry Galette

I was looking into a hoax email about acid rain in the San Francisco Chronicle when I found this beautiful recipe for a strawberry and rhubarb galette. I think it will be delicious but I need to go find some parchment paper:

"San Francisco's Destination Baking Co. makes a strawberry galette for Mission Pie but declined to share the recipe. This rhubarb and strawberry galette is a variation on the theme, inspired by the Rhubarb and Strawberry Pie in "Chez Panisse Desserts,'' by Lindsey Remolif Shere (Random House, 1985). Note that you need parchment paper for rolling out the dough."
Photobucket
Ingredients:
* The Dough:
* 2 cups all-purpose flour 3/4 teaspoons kosher salt
* 15 tablespoons chilled unsalted butter, in small pieces
* 1/4 cup ice water
* The Filling:
* Approximately 1 1/4 pounds rhubarb
* 1 pint strawberries
* 1 cup sugar
* 2 1/2 tablespoons all-purpose flour
* 1 egg yolk whisked with 1 teaspoon water
* Coarse decorating sugar


Instructions:


1. To make the dough: Put the flour and salt in a food processor and pulse to blend. Add the butter and pulse just until all the butter pieces are coated with flour and are about the size of large peas. Do not overblend.
2. Transfer to a bowl and stir in the water with a fork, mixing until the dough just begins to come together. With one hand, knead it briefly, just until you can collect the dough in a single shaggy mass. Resist the temptation to add more water. Wrap the dough in plastic wrap and press it into the shape of a large round hamburger patty. Refrigerate at least 2 hours.
3. Preheat the oven to 425 degrees. If you have a baking stone, put it on a rack in the lower third of the oven and preheat for 30 minutes.
4. Remove the galette dough from the refrigerator and let it soften for about 15 minutes so it will be easier to roll.
5. To make the filling: While the galette dough softens, trim the ends of the rhubarb stalks, then cut the stalks into 1/3-inch-wide slices. You should have about 3 3/4 cups. Hull the strawberries and chop medium-fine. In a large bowl, toss the rhubarb, strawberries, sugar and flour until well blended.
6. Roll the galette dough into a 15-inch circle between two large sheets of parchment paper. If the dough threatens to stick to the paper, lift off the paper and dust the dough lightly with flour. Replace the paper, flip the dough over and continue rolling.
7. Transfer the dough, still between sheets of parchment paper, to a pizza peel or rimless baking sheet. Remove the top sheet of paper. Top the dough with the filling, spreading it evenly but keeping it about 2 inches from the edge. Working quickly, slide a palette knife (the type used for frosting cakes) or a chef's knife under the edge of the dough and fold it over the filling to make a wide border all around. Be fastidious about patching any cracks in the dough or the filling will leak out.
8. Brush the rim of the dough with the egg wash (you may not need it all) and sprinkle the rim generously with coarse sugar. With scissors, trim away excess parchment paper. (It's OK if a little paper is exposed; it won't burn.)
9. If you are using a baking stone, slide the galette, still on parchment paper, directly onto the baking stone. If you are not using a baking stone, bake the galette on a rimless baking sheet.
10. Bake until the crust is well browned and the filling is bubbling, about 50 minutes. Slide the galette onto a rack to cool. Let cool for at least 30 minutes before slicing.


Nutrition Information:


* Per serving: 355 calories, 4 g protein, 45 g carbohydrate, 18 g fat (11 g saturated), 68 mg cholesterol, 166 mg sodium, 2 g fiber.

Tuesday, March 22, 2011

Roasted Sausage, Pepper, and Potato

This is one of my favorite things to make. It has such a meaty flavor but uses such a small amount of meat. I like to use meat to flavor dishes but I will rarely serve up a big hunk of it unless my husband asks for it.

I also like to make this when I don't have a lot of fresh produce on hand. It has everything I like in one dish: spicy, starchy, and meaty. I think I saw Rachel Ray make a version of this recipe on her TV show several years ago. It is probably Italian in origin but I haven't followed an actual recipe as long as I can remember.

There are two things that I love about this recipe: 1. It's incredibly versatile; I can use almost any variation of pepper, onion, and potato and this will still come out tasting wonderful. 2. Roasting is a very forgiving method of preparation--I can use the pepper even if it's getting a little rubbery.

It gives you a relatively complex flavor for a surprisingly small number of ingredients. The wine and the fat from the sausage get absorbed by the potatoes as they cook and make a delicious sauce.


Ingredients:
1-2 lbs of small red potatoes (I have used every kind with this dish and they all work. This would probably work with the equivalent of a large baking potato for each person)
3 links of Sweet and Spicy Italian sausage (I like to use about 1 and 1/2 a sausage for each person--I also used a habanero sausage that they sell in my area but I know this isn't for everyone)
1 Sweet Onion diced (I have used all types of onions for this as well)
1-2 red peppers diced (green, yellow, orange all work as well)
1/4 c. of red wine
crushed red pepper to taste
1 tablespoon of regano
1/2 tsp of basil

1. Heat a tablespoon of olive oil in a large dutch oven. Preheat your oven to 400 degrees. Cut peppers and onion into 1 inch pieces.
IMG_0274
2. Brown the sausages in the dutch oven until cooked and set aside.
IMG_0275
3. Saute the onions and peppers in the leftover fat. After onions are translucent (about 1-2 mins) add the red wine and allow it to simmer for another 2 minutes.
IMG_0278
Make sure you get all of the brown crusty bits from the saute off of the bottom of the pan and mix it with the wine to help form the sauce.
IMG_0279
4. While the onions and peppers are simmering cut the potatoes and sausage into bite-sized pieces and add them to the mix.
IMG_0285
5. Season the mixture with red pepper, oregano, basil, salt and pepper.
6. Put the lid on the dutch oven and bake for 45 minutes.
IMG_0286

Everything about this recipe is very forgiving, even the timing. Take the lid off and leave it in for a bit longer if you like and it will just enhance the roasted flavors.

Banana Bread

I had some bananas that were turning very brown so I decided to look for a banana bread recipe. I haven't made banana bread in a while so I didn't try anything fancy. I did half the batch because I only had two bananas left. I used a muffin pan instead of a bread pan.

I want to get a chocolate ganache frosting to put on top of them but I need to pick up some heavy cream. The next time I do this I want to try it with pineapple and chocolate chip.

Banana Bread Muffins
IMG_0287
Ingredients:
3 to 4 ripe bananas, smashed
1/3 cup melted salted butter
3/4 to 1 cup light brown sugar (depending on the level of sweetness you prefer, I always use the smaller amount)
1 egg, beaten
1 teaspoon vanilla
1 tablespoon bourbon (optional)
1 teaspoon baking soda
Pinch of salt
1 teaspoon cinnamon
1/2 teaspoon nutmeg
Pinch of ground cloves
1 1/2 cup of flour

1. Preheat the oven to 350°F.
2. With a wooden spoon, mix butter into the mashed bananas in a large mixing bowl. Mix in the sugar, egg, vanilla and bourbon, then the spices.
IMG_0289
IMG_0290
3. Sprinkle the baking soda and salt over the mixture and mix in.
4. Add the flour last, mix. Pour mixture into a muffin pan with liners.
IMG_0291
5. Bake for about 25 minutes.
IMG_0293


*Elise’s Friend Heidi’s Friend Mrs. Hockmeyer’s Banana Bread, As Jacked Up by Deb
Adapted from Simply Recipes

Wednesday, March 16, 2011

Mushroom Risotto

IMG_0251
I love making risotto. I have yet to perfect my recipe. I made this without the artichokes. I will probably also take out the asparagus next time. I don't like risotto to have a million things in it because it doesn't need all of that to be delicious.

I will also probably use chicken broth next time. I used vegetable broth and it was a bit "meh." When I read this recipe the first time, the directions were crowded into four large paragraphs instead of numbered steps. The most important thing to remember is that you have two pans: One pan with the rice and one with the hot broth. You are slowly transferring the broth to the other pan. I also like to fill my broth pot with parsley, sage, and bay leaves or whichever herbs sound good. They will infuse the broth as it boils.
Adapted from Gourmet, May 2003

Makes 4 main-course servings.

5 cups chicken/vegetable broth (40 fl ounces)
1 cup water
1 pound thin to medium asparagus, trimmed and cut into 1/4 inch thick slices, leaving tips 1 1/2 inches long
1 tablespoon olive oil
1/2 stick (1/4 cup) unsalted butter
3/4 pound fresh mushrooms, stems discarded and caps cut into 1/4 inch thick slices
2 shallots, finely chopped
1 1/2 cups Arborio rice (I used basmati this time)
1/2 cup dry white wine
2 ounces finely grated Parmigiano-Reggiano (1 cup, though I used half)

1. Bring broth and water to a boil in a 4-quart pot. Add asparagus and cook, uncovered, until crisp-tender, 3 to 4 minutes. (I actually sauted the asparagus separately but maybe they need to be cooked in the broth for a reason...)

IMG_0258

IMG_0252

2. Transfer asparagus with a slotted spoon to a large bowl of ice and cold water to stop cooking, then drain and pat dry. Keep broth at a bare simmer, covered.

3. Heat oil with 1 tablespoon butter in a 4-quart heavy saucepan over moderately high heat until foam subsides, then saute mushrooms, stirring occasionally, until browned, about 4 minutes.

IMG_0250

4. Season with salt and pepper, then transfer to a bowl.

5. Cook shallots in 2 tablespoons butter in saucepan over moderate heat, stirring, until softened, about 3 minutes.

IMG_0254

IMG_0259

6. Add rice and cook, stirring, 1 minute.

IMG_0260

7. Add wine and cook, stirring, until absorbed, about 1 minute.

8. Ladle in 1 cup simmering broth and cook at a strong simmer, stirring, until absorbed, about 2 minutes. Continue simmering and adding broth, about 1/2 cup at a time, stirring frequently and letting each addition be absorbed before adding next, until rice is just tender and looks creamy, 18 to 20 minutes. (Save leftover broth for thinning.)

IMG_0264

9. Remove from heat and stir in 1/2 cup cheese, remaining tablespoon butter, and salt and pepper to taste.

IMG_0265

10. Gently stir in asparagus, artichokes and mushrooms, then cover pan and let stand 1 minute.

IMG_0266

11. If desired, thin risotto with some of remaining broth. Serve immediately with remaining cheese on the side.

Tuesday, March 8, 2011

Baking for One: Chocolate Cake

I really wanted to bake a little something for myself. Yong doesn't really eat a lot of sweets because he was tortured as a child and only fed fruit after meals. He actually prefers the fruit now...so when I make cookies and cakes he will politely have one piece and the rest will either be devoured by me in a midnight frenzy or I will have the entirely soul-crushing task of dumping it in the trash.

So I came up with the idea to adapt the recipes for smaller batches. I want to find a very moist (but not very dense) cake recipe. I read something on chowhound about adding shredded canned beets to the recipe. I will give that a try later. First I am going to try this "Midnight Madness" cake from the Hershey's website and see how it does on it's own.

Ingredients
IMG_0235

* 3/4 c. sugar
* 1/2 c. flour (I used whole wheat)
* 1/2 c. cocoa powder
* 1 tsp. baking soda
* 1/2 tsp. baking powder
* 1/2 tsp. salt
* 1 egg
* 1/2 c. buttermilk or sour milk* (I used rice milk and vinegar)
* 1/2 c. strong black coffee OR 2 teaspoons powdered instant coffee plus 1 cup boiling water
* 1/4 cup vegetable oil
* 1 tsp. vanilla extract

1. Heat oven to 350°F. Grease and flour pans.

IMG_0238

2. Stir together sugar, flour, cocoa, baking soda, baking powder and salt in large bowl. Add eggs, buttermilk, coffee, oil and vanilla; beat on medium speed of mixer 2 minutes (Batter will be thin).

IMG_0236
Pour batter evenly into prepared pans.

3. Bake 30 to 35 minutes for round pans, 35 to 40 minutes for rectangular pan or until wooden pick inserted in center comes out clean.

4. Cool 10 minutes; remove from pans to wire racks. Cool completely. Frost as desired. Yields 5 to 6 servings.

IMG_0244

* To sour milk: Use 1 tablespoon white vinegar plus milk to equal 1 cup.

IMG_0248

It came out much better than I expected. It was so moist and chocolaty. There is a healthy amount of cocoa powder in it. I will use this one from now on. I may try doing something with the beetroot later when I am bored but I am completely satisfied with this recipe. I ate it without frosting or powdered sugar--I just sliced some strawberries and put them on top.

Thursday, March 3, 2011

Bear Butter

I was reading smittenkitchen and I saw this recipe for peanutbutter nutella. I have a huge amount of macadamia nuts. My mother in law from Hawaii sends us boxes of them several times a year. I'm still happy to get them, there are worse things than having too many macadamia nuts laying around. I use them in a lot of baking.

Roasting the macadamia nuts was a very fragrant and delicious activity. Eating the spread warm on hot toast is so amazing.

Probably makes 1 3/4 cups, but it was down to a scant 1 1/2 cups before I bothered to gauge the volume

2 cups shelled and skinned raw peanuts (works with any kind of nut)
1/2 cup of your darkest, richest unsweetened cocoa powder
1 1/4 cups powdered sugar (I used only 1 cup)
1/4 teaspoon salt plus additional to taste (I used an extra 1/8 teaspoon)
3 tablespoons peanut oil

Heat the oven to 400 degrees. Spread the peanuts evenly over a cookie sheet and roast until they darken, about 10 minutes, rattling them around a bit halfway through to they toast evenly. (If you, like me, were unable to find raw peanuts, just toast them for a 5 minutes to deepen their flavor.)

Transfer the peanuts to a food processor and grind them for about 5 minutes. First they’ll become a paste and will cause any toddler in your midst to have a meltdown from the ruckus. Then they’ll become more of a paste and finally, they’ll liquefy. Scrape down the sides as needed.

Add the cocoa, sugar, salt and two tablespoons of the oil to the food processor and continue to process until well blended, about 1 minute. Add more salt if needed. Add the last tablespoon of oil if the consistency seems too thick.

Store in refrigerator up to a week in a covered container.

Tuesday, March 1, 2011

French Apple Tart: Y U so awesome, Ina?

I had some apples in my basket that were getting a little mealy. I was dreading eating them and I was dreading throwing them away because I hate to waste food. I came up with the elegant solution of making an apple tart that I had been meaning to try. It's Ina Gartin's recipe.

There is a version of this where you just use puff pastry instead of making your own dough. I might try this next time. I had a hard time working with the super-sticky dough and the crust baked slightly unevenly because of the lumpy dough.

I used the dough I trimmed off the edges to make a little tartlet for my breakfast. Awesome.

Also, it turns out to be Justin Beiber's bday--so happy Beiberthday!

IMG_0189

Ingredients
For the pastry:
* 2 cups all-purpose flour
* 1/2 teaspoon kosher salt
* 1 tablespoon sugar
* 12 tablespoons (11/2 sticks) cold unsalted butter, diced
* 1/2 cup ice water

For the apples:
* 4 Granny Smith apples (I used mealy Gala apples and it was still delicious)
* 1/2 cup sugar
* 4 tablespoons (1/2 stick) cold unsalted butter, small diced
* 1/2 cup apricot jelly or warm sieved apricot jam
* 2 tablespoons Calvados, rum, or water (I used Grand Marnier)

Directions

1. For the pastry, place the flour, salt, and sugar in the bowl of a food processor fitted with the steel blade. Pulse for a few seconds to combine.

2. Add the butter and pulse 10 to 12 times, until the butter is in small bits the size of peas.

IMG_0190

3. With the motor running, pour the ice water down the feed tube and pulse just until the dough starts to come together.

4. Dump onto a floured board and knead quickly into a ball.

5. Wrap in plastic and refrigerate for at least 1 hour.

6. Preheat the oven to 400 degrees F. Line a sheet pan with parchment paper.

7. Roll the dough slightly larger than 10 by 14-inches. Using a ruler and a small knife, trim the edges. Place the dough on the prepared sheet pan and refrigerate while you prepare the apples.

8. Peel the apples and cut them in half through the stem. Remove the stems and cores with a sharp knife and a melon baler.

IMG_0193

9. Slice the apples crosswise in 1/4-inch thick slices.

IMG_0196

10. Place overlapping slices of apples diagonally down the middle of the tart and continue making diagonal rows on both sides of the first row until the pastry is covered with apple slices.

IMG_0200

11. Sprinkle with the full 1/2 cup of sugar and dot with the butter.

12. Bake for 45 minutes to 1 hour, until the pastry is browned and the edges of the apples start to brown. Rotate the pan once during cooking. If the pastry puffs up in one area, cut a little slit with a knife to let the air out. Don't worry! The apple juices will burn in the pan but the tart will be fine!

IMG_0211

13. When the tart's done, heat the apricot jelly together with the Calvados and brush the apples and the pastry completely with the jelly mixture.

IMG_0207

14. Loosen the tart with a metal spatula so it doesn't stick to the paper. Allow to cool and serve warm or at room temperature.

IMG_0210