Sunday, February 26, 2012

Oreo Mini Cheesecakes

Photobucket

I got sick the day after we flew home from visiting his parents. I have a lot of recipes that I want to try but I have just not been feeling up to it. This one was very simple and only required a few ingredients so I threw it together last night and it was delicious. This isn't the really dense, egg-y type of cheesecake that I typically love, but it does come on top of an oreo cookie so I think it is still worthwhile.

On my second batch I used only half of an oreo on the bottom. Cutting through a whole oreo with a fork is difficult but it's up to you. They do look more striking with the whole cookie when served.

Photobucket

Cookies and Cream Cheesecake Cupcakes
From Martha Stewart's Cupcakes
Yield: 30 cakes

Ingredients:
42 cream-filled sandwich cookies, such as Oreos, 30 left whole, and 12 coarsely chopped
2 pounds cream cheese, room temperature
1 cup sugar
1 tsp vanilla extract
4 large eggs, room temperature, lightly beaten
1 cup sour cream
Pinch of salt

1. Preheat oven to 275 degrees. Line standard muffin tins with paper liners. Place 1 whole cookie in the bottom of each lined cup.

2. With an electric mixer on medium high speed, beat cream cheese until smooth, scraping down sides of bowl as needed. Gradually add sugar, and beat until combined. Beat in vanilla.

3. Drizzle in eggs, a bit at a time, beating to combine and scraping down the sides of the bowl as needed. Beat in sour cream and salt. Stir in chopped cookies by hand.

Photobucket

4. Divide batter evenly among cookie-lined cups, filling each almost to the top. Bake, rotating pan halfway through, until filling is set, about 22 minutes. Transfer to wire racks to cool completely. Refrigerate at least 4 hours (or up to overnight). Remove from tins just before serving.

Photobucket

Photobucket

Monday, February 20, 2012

Kimbap

Photobucket

So I was visiting my in-laws in Oahu and in a whirl of over-eating, watching Korean soap operas, and trying to sleep off the giant meal we just ate, I finally managed to get my mother-in-law to teach me how to make Kimbap. She has a very specific way of cooking by feel so the recipe is not exact. She has probably made this meal a thousand times so I understand that she doesn't have any need for exact measurements. I think she found it perplexing when I asked her to estimate the amounts. She would just say "oh you know, a little bit" and hold out her hand to show me. The next time I make it I will measure out the ingredients but this is my best guess of the amounts she used.

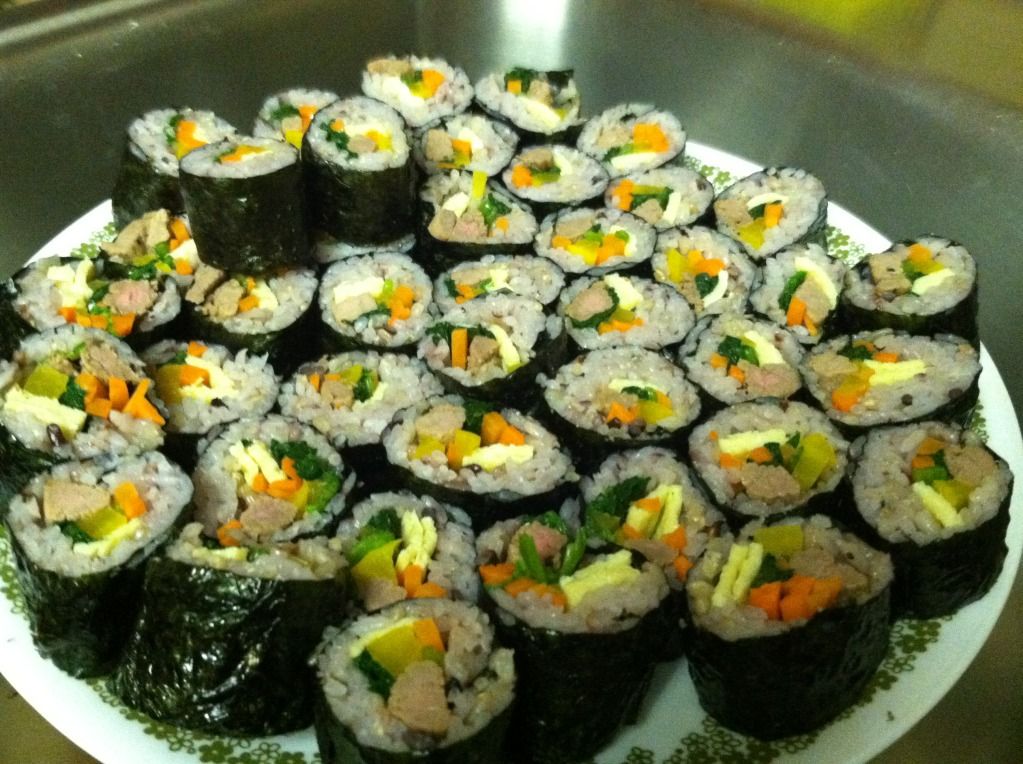
This is my husband's favorite Korean dish so I wanted to try to figure out how to make it for him. It is a lot of preparation but it's really good to make for a large group of people. I would estimate that you could feed 5-6 people with this recipe. We had 4 people at dinner plus a ton of leftovers that we ate on the plane ride home. The radish, sushinori, and bamboo mat are the only ingredients that you might not be able to find in an average supermarket, but you can find them at any asian market.

She said you can also substitute some cucumber for the spinach. I imagine you can make any number of substitutions depending on what you have. She also used some brown and purple rice mixed in but I like the plain white rice more. If I'm feeling ambitious I might try to make these at Thanksgiving. I like that I can easily make half of these vegetarian for my sister and cousins.

This seems like a lot of steps but you can prepare the filling ingredients well in advance and then roll the sushi whenever you are ready. This is not served piping hot but more at room temperature with kim chi.

Ingredients:
1 white onion
soy sauce
black pepper
salt
sugar
olive oil
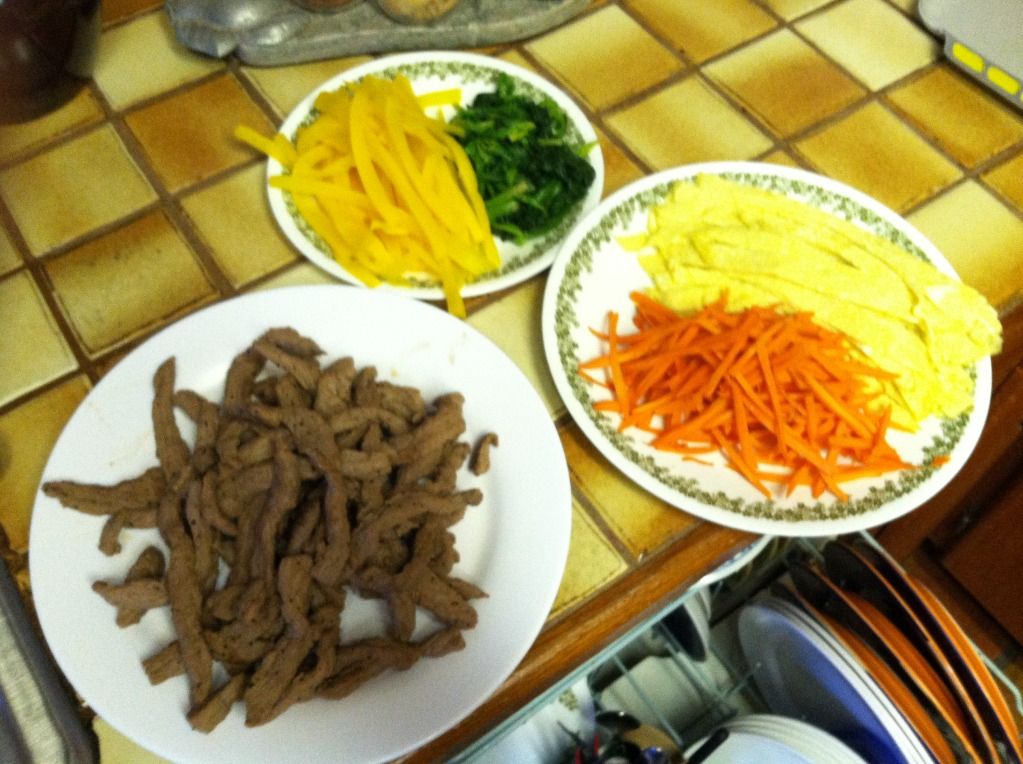
1/2 large yellow pickled daikon radish (julienned)
2 carrots (julienned)
5 eggs
1 bunch of spinach (with large stems)
2 lbs. lean cut of beef cut into strips
1 package of sushinori
bamboo mat for rolling sushi

Directions:
1. Prepare 5 cups of white rice in the rice cooker or according to the directions on the package. Marinate the beef with onion, 1 tbsp. olive oil, 2 tbsp. soy sauce, 1 tbsp. sugar, and some black pepper for about 2 hours. You can reserve the onions for another dish like Bulgolgi but you won't actually use them in this recipe other than as a marinade.

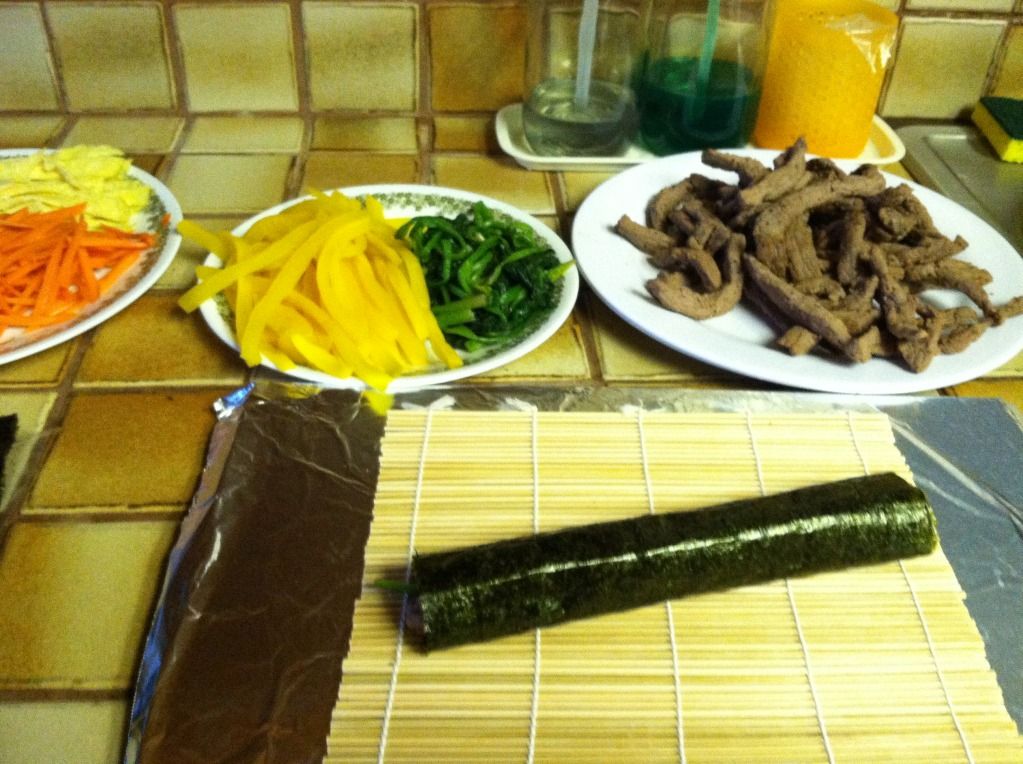
2. Julienne radish and carrots. The radish looks similar to this one in its package although I didn't take this picture. I have seen them at the Korean market near our house:
Photobucket

3. Squeeze the extra juice out of the radishes with a paper towel.

4. Season the eggs with some salt, pepper, and olive oil and make two flat omelets from them. Cut into 1/2 inch strips. Set aside.

5. Saute the carrots in the omelet pan with a little salt and oil over high heat for a few minutes. Set aside.

6. Bring 5 cups of salted water to a rolling boil and then remove from heat. Place the spinach inside the boiled water for a minute or so until just wilted but not mushy. Drain and set aside.

7. Saute the marinated beef until browned.

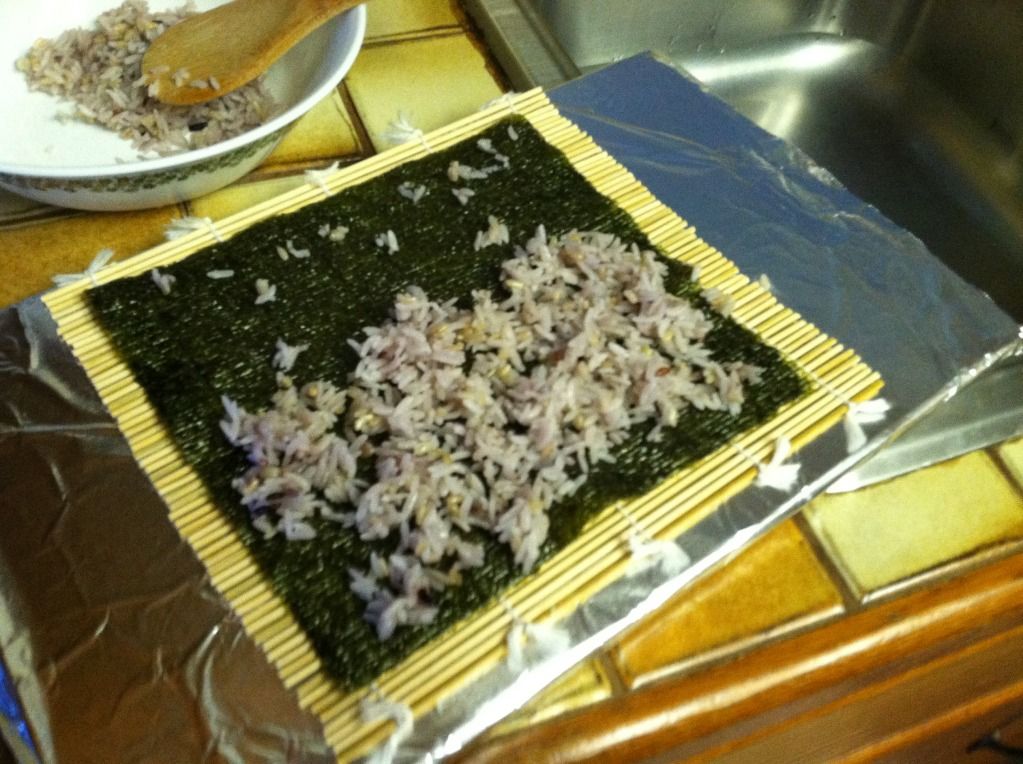
8. Gather all of your ingredients and remove the rice from the cooker to cool slightly (to make it easier to wrap).

Photobucket

9. Lay a piece of shushinori with the rough side up on a cutting board. place rice about 1/2 and inch thick onto the bottom half of the sushi (slightly more than half). Smear some of the rice pieces along the top to help seal it.
Photobucket

10. Layer a piece of omelet, strips of beef, carrots, spinach, and radish on top of the rice.
Photobucket

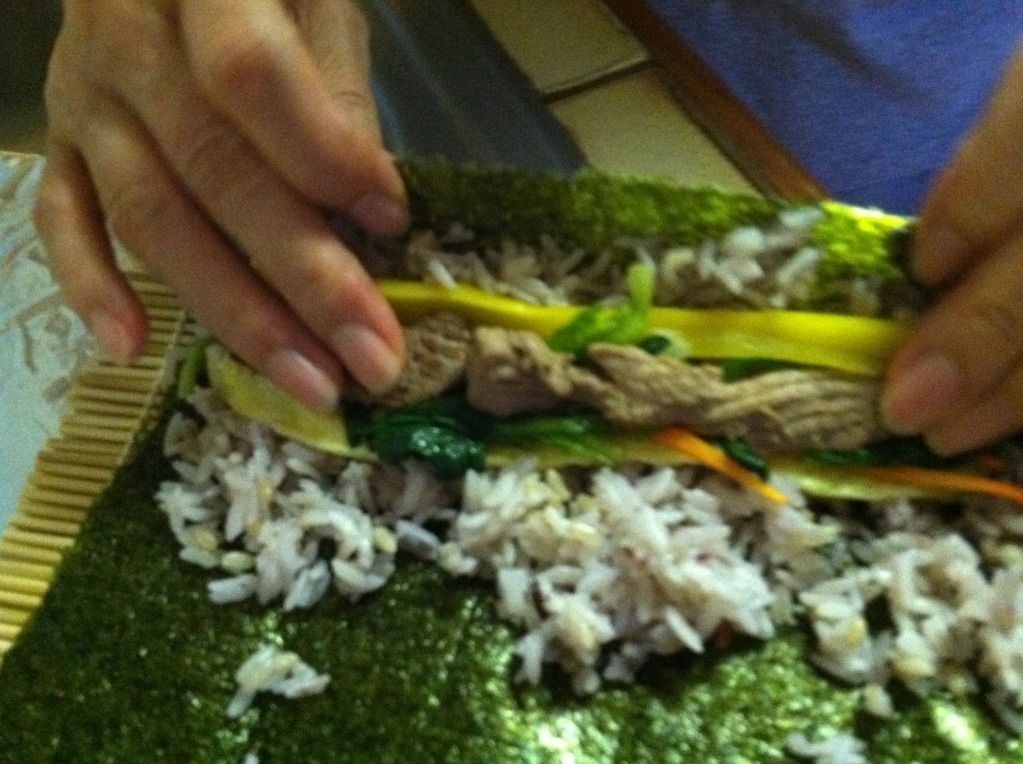
11. Try to roll the rice so that it covers the ingredients inside. Use the mat to continue to seal and wrap up the roll. Continue rolling the ingredients in this way until you run out.
Photobucket
Photobucket

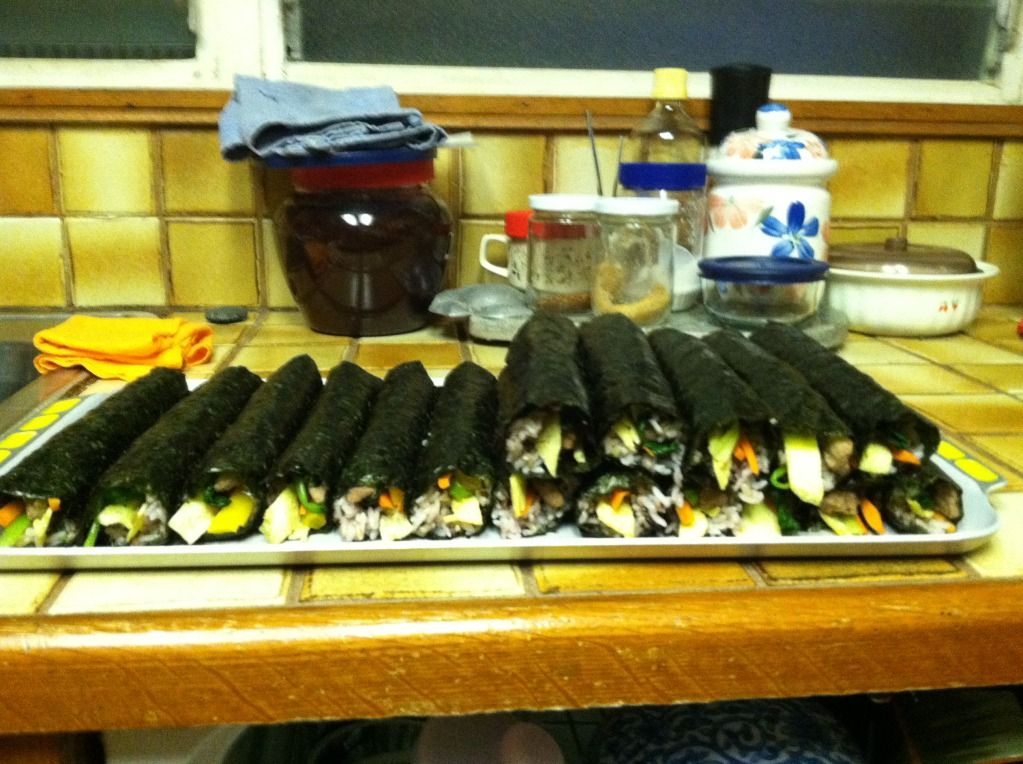
12. Use a sharp knife coated in sesame oil to cut the sushi into about 6-8 pieces/roll.

Thursday, February 2, 2012

Sea Salt Caramels

I had a ton of beautiful Belgian chocolate leftover from making the Reese's eggs. I also happened to have a some heavy cream so I thought I would try making some (for the first time!) and dip them in the chocolate. The flavor of the caramels is so good I think that the chocolate would only complicate things. I ended up just leaving them as is. I will use the chocolate for some other purpose.

February is the month for candy-making with all of the birthdays and Valentine's Day fast approaching. My dad loves caramel so I wanted to mail him some for his birthday. I made a double batch of these. There is no way for me to adequately communicate to you how good these smell as you're making them. Also, when you're done you have a caramel coated spoon to enjoy as the rest of them cool. I took this recipe from Judicial Peach.

*Notes on temperature: You really need some kind of a candy thermometer to make these properly. The first time I did the batch I didn't get the temperature up high enough and they were really soft and stuck to the wrappers. I read on chowhound that it was possible to reheat them so I did and they came out much chewier and held their shape in a wrapper, so that is possible to do if you come across the same problem.

Homemade sea salt caramels
PREP TIME: Requires a few hours of cooling
COOK TIME: 20 minutes
YIELD: 16 to 20 Caramels

WHAT TO GRAB:
Vegetable oil
1 cup sugar
1/4 cup water
1/4 cup light corn syrup
1 cup heavy cream
4 tablespoons unsalted butter
1 teaspoon sea salt, plus extra for sprinkling
1/2 teaspoon vanilla extract

HOW YOU DO IT:

1. Line an 8-inch square baking pan with parchment paper. Lightly brush the paper with the vegetable oil.

2. In a small pot, bring the cream, butter, and one teaspoon of the sea salt to a simmer, over medium heat. Do not let it boil. Once it has reached a simmer, turn off the heat, and set it aside.

3. In a deep saucepan, combine the water, corn syrup, and sugar. Over medium-high heat, stir only until the sugar has dissolved. Then allow the mixture to boil, without stirring, until the mixture is a warm, golden brown. Watch very carefully, as the caramel can burn quickly toward the end. (It can be helpful to use a wooden spoon and drip some of the caramel onto a white plate to gauge the exact color).
Photobucket

4. When the sugar mixture is done, remove it from the heat and slowly add the cream mixture to the sugar mixture. Be careful because it will bubble up violently. Stir in the vanilla.
Photobucket

5. Return the mixture to the heat and cook over medium heat until a candy thermometer reads 248 degrees (firm ball), about 10 minutes. Pour the caramel into the prepared pan. (Don’t scrape the pot). Refrigerate for a few hours, until firm.
Photobucket

6. Remove the caramel from the refrigerator and allow it to come close to room temperature. Pry the caramel from the pan. On a cutting board, cut the square in half. Using parchment paper, roll each piece of caramel into a tight 8- to 10-inch log. Sprinkle the logs with sea salt. Cut each log into 3/4-inch or 1-inch pieces. Individually wrap each caramel in glassine or parchment paper, twisting the ends. Store in the refrigerator or in an air-tight container.
Photobucket

Photobucket

Photobucket

Peanut Butter Chocolate "Eggs"

Photobucket
I was engaging in post-xmas-stocking-candy binges with my little sister, Siena, and her friend, Mandy. We were having Reese's Xmas Trees. We were discussing why the trees (This goes for pumpkins and eggs as well) are so much better than the ordinary cups. I realize this must be because of how the proportion of chocolate to peanut butter changes. We're always broaching topics of such importance.

I finally uploaded a picture of the cookie tray at my Grandmother's house. This is the show tray. There were also boxes and boxes of back up cookies nestled in wait in the cold garage, like reserve troops, ready to spring forth at any moment:
Photobucket

This homemade version of Reese's "eggs" was brought to my attention via pinterest and you can see the original recipe at The Whimsical Princess. It's very much a gimmicky, pinterest-y recipe but it's still wonderful and so many people have a soft-spot for this kind of food. The homemade ones so so much better for several reason:

1. You can use any kind of chocolate or combination of chocolates that you want. I found a great deal on some Belgian milk chocolate at the grocery outlet and added some Ghiardelli 100% cocoa nibs to give it a little more body--perfect for the party I intend to give these to. If I were making these for myself I would have used at least 70%.
2. Processed peanut butter filling is delicious but texturally kind of gross (i.e sandy or gritty). I used Peter Pan smooth peanut butter and the candies came out smooth and dreamy.
3. They are easy to make, look adorable nested in tiny fluted cupcake cups, not to mention cheaper and they make great gifts for Valentine's Day. *awkward wink*

If I haven't sold you on at least writing these on a 'to-do' list for a special occasion then there is no hope for you and I have also failed.

The Whimsical Princess’s Chocolate Peanut Butter Eggs
Ingredients:
4 cups powdered sugar
1 1/2 cups Creamy Peanut butter
1/4 cup butter or margarine
2-3 tablespoons milk
3 cups semisweet chocolate chips
1 tablespoon Shortening

Directions:
1. Mix together the powdered sugar, peanut butter, shortening, and butter.

2. Add the milk one tablespoon at a time until it becomes a nice workable dough. It will be just like play dough, it will be really easy to work with.

3. Form the dough into egg shapes, and place in the freezer for about an hour.

4. Temper the chocolate in a double boiler.
Photobucket

5. Dip each egg in the melted chocolate and place on waxed paper until set. (I used a toothpick. Cover the hole if you want but I think they look kind of cute with the hole.
Photobucket


6. Once they are set you can trim any excess chocolate off that may pool at the base with a pairing knife to make them look pretty.

Photobucket